
Blog, Business/Startup, Mistakes To Avoid, Photo/Video Shoots
Top 8 Tips on How to Prepare for a Successful Photoshoot as a Fashion Designer

Apr
Top 8 Tips on How to Prepare for a Successful Photoshoot as a Fashion Designer
Don’t know how to prepare for a photoshoot- successfully?? I always tell my clients, planning a photoshoot can take weeks, even months to prepare. And the more time you give yourself, the less stress and better shape you will be in come shoot day. So here are my top 8 tips on how to prepare for a photoshoot to ensure that it is a success!
There’s Actually 9 Tips!
Download the easy to print checklist here.
Step 1. Create a Storyboard/Visionboard
What is your vision for the shoot? What is the mood you are looking to create? What will be the end use of the shots? Are they going on your E-commerce website? Social media? One of the most important steps on how to prepare for a photoshoot is to take some time to really think about where you are going to use the photos as it will play a huge role in the type and look of photos you need. In most cases you will want 3 types of shots; 1) Flat Detail= Garment on white ground laid out flat (with closeup shots of important details) 2) E-commerce= Garment on model with little to no accessories (think JCrew site). You may want to grab a complete 360 view as this can be used for a variety of things later on. 3) Styled/Glamour shots= Can be done in a park or outdoor setting, with more movement from model. The idea is to show how these pieces can be used in every day life and how good they make you feel when you have them on. From this you can then create a ‘Shot list’ of shot looks you would like to emulate. You can even create a pinterest board for this and share it with your photographer/stylist/models ahead of time. Also please please have it printed out for the day of so you and your stylist can easily reference it and mark off the ones you do as you go along. This will help to ensure that nothing is forgotten. The worse thing is to go home after a long full day of shooting to realize that some key shots were never actually taken 
Step 2. Select a Photographer
Be sure you select the RIGHT photographer. What does that mean??? Well they should have experience in fashion photography, and they should be willing to listen to your vision/art direction. The last thing you want is too many cooks in the kitchen! If you have one idea, and they have another, it will be difficult to get the look you want in the end. So be sure to review their portfolio ahead of time and see if they have the type of shots you like. Do you want blurred backgrounds, posed photos, candids, etc? Also how are they charging you? By the hour? Is all the photoshop editing included? These are important questions to ask as it could cost you more than you think in the end.
Step 3. Host a Model Call
Now that you know what the vision and look is, you will be able to best select the right models. Ask yourself- Do I want a red head with freckles? Or maybe a short punky blonde? Also consider the number of models you will need. Depending on the number of looks/outfits you want to shoot, you may need more than one model, especially if you are trying not to take up too much time. Think about if you want shots of the models together, dancing, walking down street, etc. Be sure when creating flyers for your model casting that you include any specifics on measurements, the look you are going for, location, contact info, etc. Don’t know where to find models??? Model Mahem is a great site to check out! if you are on a budget, try to find new models who are willing to work for prints only. And don’t be afraid to call the top model agencies as they may be willing to send you some of their newer models who need work.
Step 4. Select Hair and Makeup Artists
As with a photographer, selecting hair and makeup artists can be tricky, especially today where we live in a world full of youtube videos and everyone thinks they can do makeup! You will want your vision for hair and makeup to be followed so again select someone who is willing to cooperate with you. Again be sure you see samples of their previous work before you book them. They should have a lot of experience otherwise you are taking a huge chance. Once you do book them, go over the look you want to achieve ahead of time with them (and no I don’t mean the night before)! It is important that you show them pics of your models, as well as inspiration photos at least 2 Weeks in advance so they can plan what tools to bring and purchase any additional supplies they may need. What if you don’t know any hair and makeup people?? Ask your photographer as they are often great about recommending. I also have some great referrals I can send you too 
Step 5. Discuss Location/Backgrounds
I always recommend my clients plan out the locations they want to use WAY ahead of time as your location will play a huge role in your end shot look. If you have your heart set on shooting with a cherry blossom tree, you will want to make sure that the park you select has those types of trees, and that they will be in bloom on the date you decide to shoot. So scout out your location ahead of time and plan the areas you will want to shoot. Be sure to go at the time of day you expect to be shooting at as the sun position is crucial. Any good photographer will tell you that direct sunlight is the worse thing for photos as it creates shadows and squinty eyes (check out the example below). Shaded areas are always best. For this reason most outdoor shots are best done either very early morning or late afternoon/sunset time, which will be something to consider when planning your time schedule which I will get to in a bit. 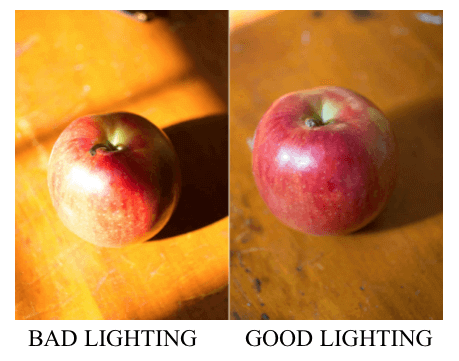
Other things to consider with locations;
- Will there be a garment rack or place to hang your garments so they don’t get wrinkled? If not I recommend bringing one yourself.
- Is there a Bathroom close by?
- Are there changing screens/rooms? If you are shooting outside, where is your model going to change? You may want to bring a large sheet that 2 people can hold up around her to change in. You won’t always have time to have her run to the bathroom each time
- Temperature? Are you shooting a bikini shoot in Dec? If so your model is going to be cold so you will need to be sure to bring a coat or something warm to wrap around her while she is waiting in-between shots
Want to know exactly what to bring on the day of?
Download our “How to Prepare a Photoshoot” Checklist here so you don’t forget anything.
Step 6. Plan Looks (i.e.. Model Cards)
When I started working backstage dressing models during fashion week, I quickly learned the necessity of planning the models’ outfits, accessories/shoes , etc., for each look. Again you will want to do this at least a few weeks in advance. This is how you prepare for a photoshoot properly. The easiest way to do this is to create what we call “Model Cards” in the industry. Start by taking full length and detailed photos of the outfits (either on a model or flat on the ground) and have each one printed out so you can attach them on a large poster board sheet. You will want to take close up shots of all accessories (preferably showing how they are worn on model, which hand, etc.). Next to the photos you will want to list all the items included in this look, along with any specific instructions for how the look is achieved. 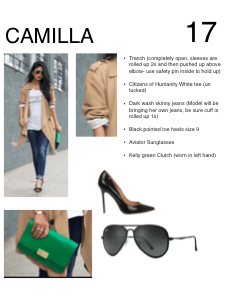 For ex. Trench (completely open, sleeves are rolled up 2x and then pushed up above elbow) Citizens of Humanity White tee (un tucked) Dark wash skinny jeans (Model will be bringing her own jeans, be sure cuff is rolled 1x) Black pointed toe heels size 9 Aviator Sunglasses Kelly green Clutch (worn in left hand) You will want these model cards to be as detailed as possible so that it is easy for your stylist/dresser/model to see what needs to be put on and how it should look. As the designer, you will not have time to be dressing models yourself. You can then add your model’s name at the top along with the order number and use a pant hanger to hang the card up on your clothing rack in front of the specific outfit it corresponds with. Consider these things as well;
- Do the models need to bring anything of their own? Makeup? Shoes? Extra clothes? Bras (strapless, nude, etc). And please be sure they wear a nude seamless thong. Nothing is worse than lacy underwear showing through your clothes.
- You may need to purchase some additional clothes, accessories, shoes, or props to round out your looks. Just keep the tags on them, and tape up the bottoms of your shoes so you can return them later
- If you do have multiple models you will need to decided AHEAD of time which outfits will go on which models. This is why making Model cards is a good way to keep track as you can put the model’s name at the top of the card.
- Think about clothing changes as you will want to plan the outfits so that there is the least amount of changing as possible. Changing time can really eat into your shoot time so trying to minimize it as much as possible is best. Think about using the same top for 2 looks and only changing the pants, or throwing on a jacket on over the look, etc.
- Don’t plan too many shoe changes as that can take a while as well. If the model can keep the same shoes and quickly change into the next outfit, try to do that.
- Once you have all your model cards complete, you will want to number them in order of shot so that anyone can quickly go from one to the next (without your supervision)
Step 7. Set a schedule for the day 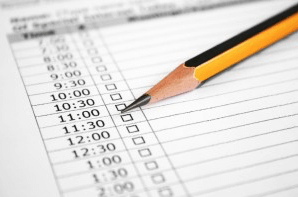
DON’T SKIP THIS STEP! It is very important that you set a schedule for the day and plan so that you have enough time to accomplish your goals. Think about when you need everyone to arrive? Photographers usually need time to set up cameras, lighting, props , etc. Also allow ample time for hair and makeup if it is elaborate. It can easily take 1-2 hours for hair and makeup for each model. If you are shooting both inside and outside photos, be sure to plan which will be first based on sunlight/temperature , etc. And give yourself a good 30-45min lunch break as your models will need it. Then once you have all of this planned, be sure to tell everyone their assigned time of arrival so they can prepare to be there when you need them to be. And then call them the day before to remind them, the last think you need is someone forgetting or over sleeping!
Step 8. Prep Samples
You will want to make sure that your samples are completely ready and prepped ahead of time for the shoot. This means no loose threads, all buttons sewn on tight, labels are in the right place, all tags and stickers have been removed or hidden from sight, etc. Tip: If you have hanger loops, a good trick is to place a piece of double sided tape on the inside underarm of the garment and press the hanger tape to it. This will help insure that it stays in place as the model moves around. Plus your photographer will LOVE you as they won’t need to photoshop all those stupid straps hanging out. 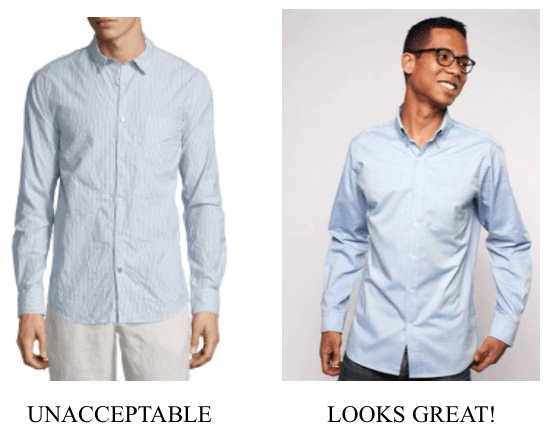 Your garments should also be pressed/steamed ahead of time as well as the morning of, as they often get wrinkled in the process of moving them to the location. They need to look absolutely pristine for the shoot. Place them neatly in plastic bags and then garment bags to protect them from snagging or getting ruined by anything. If you’re lending out your clothes for an editorial shoot, definitely be sure to have a pull letter!
Once you have gone through these 8 steps you are ready for your shoot! We hope you learned a lot and now know how to prepare for a photoshoot! So tell me what was your biggest take away from this list? Did you learn anything new? Have any horror stories from past shoots?? Do you have any other recommendations on how to prepare for a photoshoot? Please comment below and share this article with any designers you know- they will thank you for it!
If you’d like specialized advice for your line, contact us here to book a Discovery Call!
Stay tuned for the next article on what to do DURING the shoot to make sure you stay on time and get what you want! XOXO
Like this post?
Sign up to get more like it
This blog post was SO helpful. I was managing a photo shoot for the first time and didn’t know where to start but then I found it and immediately I was able to confidently hire and plan accordingly. The photo shoot ended up being a total success! Thank YOU!
Maria
I’m so glad you had so much success! Would love to see how the photos came out!
Hi, this blog was soooo helpful for me, as I am new to this, I don’t know where to start, how to select a theme… What to do… Confuse myself and got stressed… After reading the blog had a clear picture for photoshoot.. Started the work for it…. Thank-you so much,.
Hi Nithya,
I’m so glad this blog has helped you! What are you doing the photoshoot for? Is it for your own fashion line? Have you decided on a theme? Keep me posted!
This was helpful. Am a new fashion designer trying to market a good fashion brand. I would follow the steps and give feedback on how it went. Thank you
Hi Nana! That’s so awesome! I’m glad that it helped. I’m also going to be doing a full day photoshoot workshop in August that will include some demo/instruction from a fabulous photographer and stylist. Plus you’ll have a chance to get some great photos of your line as well as we will have 2 models and hair and makeup team!!! It’s gonna be awesome. Click here for more info https://fashionbootcamp17.eventbrite.com
Im so greatfull that I have come across this article as I had no idea where to start and im so interested in fashion designer carrier…God bless you.
Hi Magreth! I’m so glad to hear this! If you’re interested, I’d love to speak for a few minutes to see what your goals and dreams are and whether we’d be a good fit to work together. Just click on the free 20 min Discovery Call button on home page 🙂
I’m so unprepared for my first shoot but I’ll sure follow most of the steps that I can.
Let us know how we can help so your shoot is a success!
Hi. Thank you so so much for taking time to detail these necessary steps. I have done couple of photo shoots for my website and I always find myself so stressed out by the end of it all yet it’s always a huge mess. Clothes wrinkled, I even took couple of website shots outdoor which from your explanation I now understand is not proper and I guess it’s because it’s kind of distracting to see all surrounding images instead of just looking at the outfits. Now I know why outdoor shots are taken. I had another photo shoot scheduled for the 17th of February 2019 but after reading your blog post there’s no way I am doing it on that day. There’s so much to put in place first. Thank you so much. I don’t mind more advice. Pls can you tell me the effectiveness of a lookbook on a website and are those outdoor photos?
This is very informative. Thanks for sharing your informative article with us. Keep up the fantastic work.
Yes I agree!! Definitely have to plan every step of the photoshoot.
Thank you for your comment! So glad we could help!